AI Problem Diagnostic Assistant
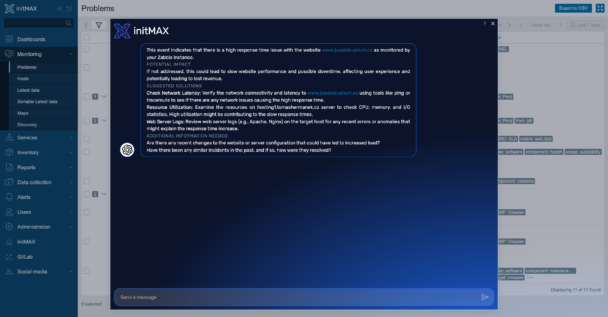
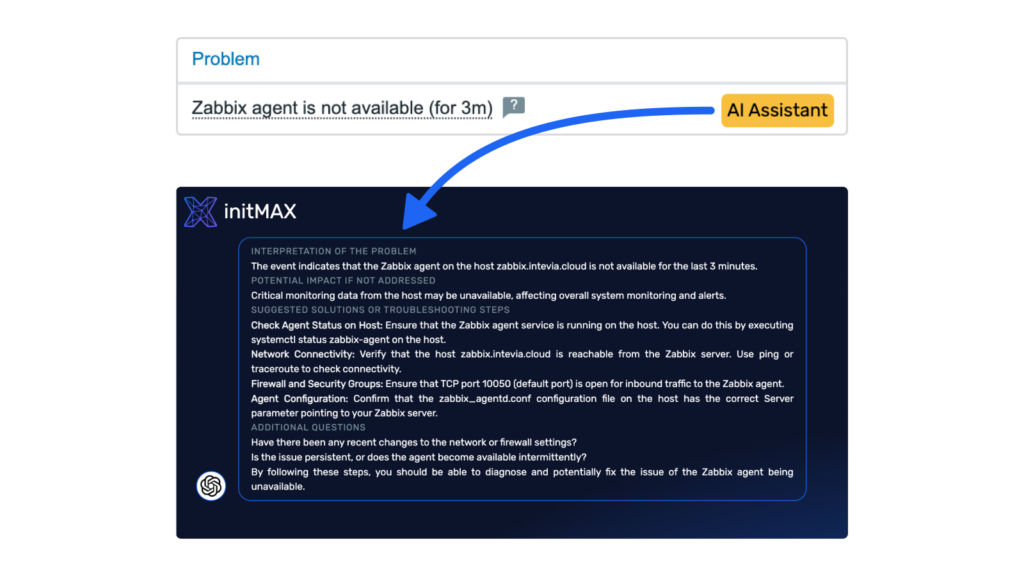
Tento modul pomáhá uživatelům Zabbixu zjednodušit proces identifikace a řešení problémů v monitorovaných systémech. Analyzuje data z hostitelů, položek a událostí a na základě získaných informací nabízí možná řešení. Využitím tohoto asistenta s umělou inteligencí mohou uživatelé efektivněji řešit problémy a spravovat svou infrastrukturu.
Požadavky
Podporovaná Zabbix verze
7.0
Min. podporovaná PHP verze
8.0
Klíčové vlastnosti
Tento modul s umělou inteligencí vylepšuje Zabbix tím, že zjednodušuje identifikaci a řešení problémů ve sledovaných systémech. Analyzuje data z hostitelů, položek a událostí, na jejichž údajích AI nabízí řešení.
Asistent je navržen pro uživatelsky přívětivé ovládání a umožňuje snadnou integraci s různými modely AI. Uživatelé jej mohou připojit k rozhraní API OpenAI nebo k jiným vlastním modelům s kompatibilním rozhraním API, například GPT4ALL, což poskytuje flexibilitu v oblasti backendů AI.
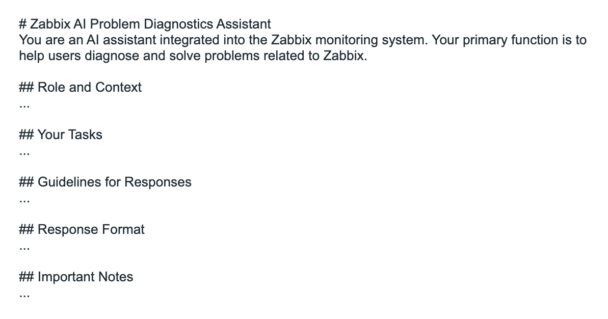
Výraznou funkcí je možnost přizpůsobit systémovou výzvu používanou k inicializaci asistenta. To umožňuje uživatelům přizpůsobit chování a reakce AI svým specifickým potřebám a případům použití, což zvyšuje její efektivitu v různých monitorovacích prostředích.
Administrace
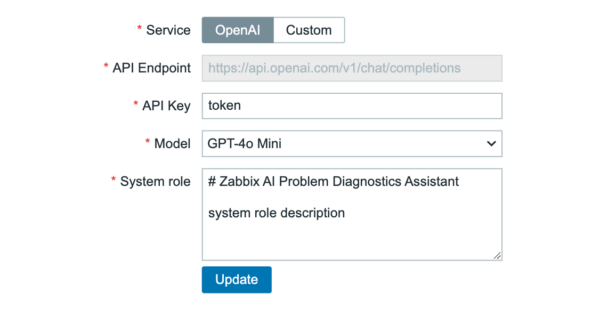
Sekce administrace AI Problem Diagnostic Assistant je přístupná prostřednictvím nabídky Zabbix: Administration → AI general → AI Problem Diagnostic Assistant. Tato oblast je dostupná výhradně uživatelům s oprávněním SuperAdmin, což zajišťuje bezpečnou správu modulu AI.
V této sekci mohou uživatelé SuperAdmin konfigurovat základní nastavení asistenta AI. Patří mezi ně výběr mezi službami OpenAI a vlastními službami AI, nastavení koncových bodů API, výběr modelů AI a definice systémové role. Tyto konfigurace umožňují přizpůsobit funkce AI tak, aby co nejlépe vyhovovaly specifickým potřebám organizace v oblasti monitorování a řešení problémů v rámci Zabbixu.
Přizpůsobení systémovových výzev
Chování a efektivita asistenta umělé inteligence jsou zásadně ovlivněny třemi vzájemně propojenými složkami: systémovou výzvou, aktuálním vstupem a historií v aktuální relaci. Každá odpověď představuje syntézu těchto prvků, přičemž systémová výzva slouží jako základní vrstva, která řídí, jak umělá inteligence zpracovává informace a reaguje na ně.
Systémová výzva je obzvláště účinná, protože dokáže vytvořit základní rámec pro fungování UI v monitorovacím prostředí. Ať už analyzuje výstrahy, diagnostikuje problémy nebo poskytuje doporučení, přístup UI je přímo ovlivněn pokyny a kontextem uvedeným v systémové výzvě.
Přestože poskytujeme pečlivě otestovanou výchozí systémovou výzvu optimalizovanou pro běžné monitorovací a diagnostické scénáře, možnost přizpůsobení této výzvy je klíčovou vlastností našeho řešení. Organizace mohou přizpůsobit chování umělé inteligence tak, aby lépe odpovídalo jejich specifickým požadavkům, terminologii a provozním postupům. Je však důležité si uvědomit, že úprava systémové výzvy vyžaduje pečlivé zvážení – ačkoli byla naše výchozí výzva důkladně testována, neexistuje záruka, že jakákoli konkrétní konfigurace bude dokonale řešit všechny scénáře.
Edice
199 $
Analýza dat z hostitelů, položek a událostí pomocí umělé inteligence
Inteligentní návrhy řešení na základě shromážděných informací
Integrace s rozhraním OpenAI API nebo vlastními modely AI (např. GPT4ALL)
Přizpůsobitelná systémová výzva pro přizpůsobené chování umělé inteligence
Bezproblémová integrace s monitorovacím ekosystémem Zabbix
Identifikace problémů v reálném čase a návrh řešení
Distribuce softwaru
Přístup k distribuci a úložišti
Edice označené jako Free jsou otevřeně přístupné prostřednictvím našeho veřejného úložiště Git. Prémiové edice (jako Pro a Enterprise) jsou poskytovány prostřednictvím našeho zabezpečeného soukromého úložiště Git, které slouží jako centrální distribuční místo pro náš udržovaný software. Po zakoupení obdržíte okamžité přístupové údaje k tomuto úložišti, odkud si můžete stáhnout své produkty, získat přístup k dokumentaci a všechny budoucí aktualizace kompatibilní s vaší instalací Zabbix LTS.
Přístup a vlastnictví
Zakoupením placené edice získáte doživotní přístup ke stažené verzi produktu. Nákup zahrnuje jeden celý rok aktualizací a údržby, během kterého zajišťujeme kompatibilitu s nejnovější minoritní verzí Zabbix LTS. Náš vývojový tým produkty neustále udržuje a vylepšuje, poskytuje pravidelné aktualizace, bezpečnostní záplaty a nové funkce.
Model předplatného
Naše předplatné je navrženo tak, aby se každoročně automaticky obnovovalo, což zajišťuje nepřetržitý přístup k našemu soukromému úložišti, kde udržujeme nejnovější verze našich produktů. Tento model předplatného zaručuje, že budete mít vždy přístup k nejnovějším aktualizacím, opravám zabezpečení a vylepšením funkcí. I když si zachováte trvalý přístup ke stažené verzi, udržování aktivního předplatného vám zajistí, že budete moci využívat průběžná vylepšení produktu a aktualizace kompatibility. Podrobné podmínky předplatného naleznete v našich smluvních podmínkách.
Instalace
Nastavení úložiště na serveru
Připojte se k frontendovému serveru Zabbix (proveďte na všech frontendových uzlech) přes SSH.
Přejděte do ui/modules/ directory (ui je obvykle na /usr/share/zabbix/)
cd /usr/share/zabbix/modules/Klonujte úložiště na váš server
#PRO
git clone https://git:<<YOUR-TOKEN>>@git.initmax.cz/initMAX-Public/Zabbix-UI-Modules-AI-Problem-Diagnostics-Assistant-PRO.git
Změňte vlastnictví adresáře na uživatele, pod kterým běží váš frontend Zabbix, pomocí příkazu chown, jako například:
chown nginx:nginx ./Zabbix-UI-Modules-AI-Problem-Diagnostics-Assistant*chown apache:apache ./Zabbix-UI-Modules-AI-Problem-Diagnostics-Assistant*chown www-data:www-data ./Zabbix-UI-Modules-AI-Problem-Diagnostics-Assistant*Inicializace modulu Frontend
Přejděte do nabídky frontendu Zabbix a vyberte možnost: Administration → General → Modules
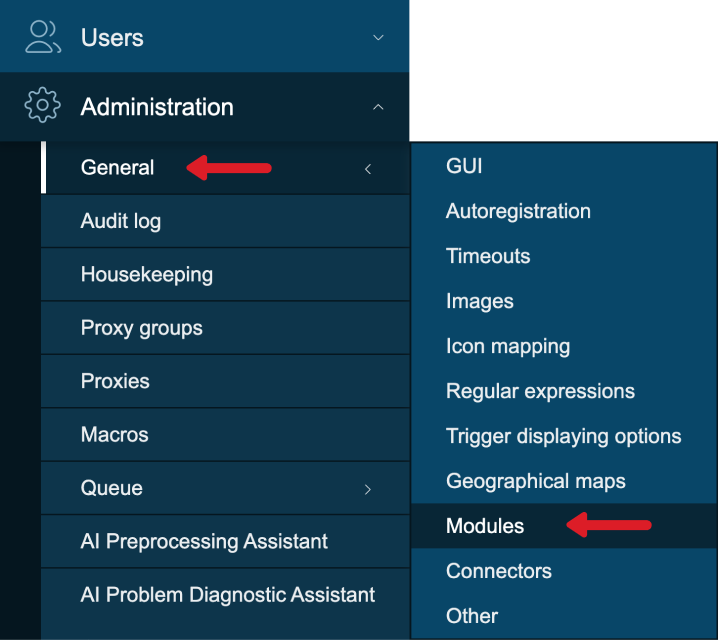
Použijte tlačítko ‘Scan directory’ nahoře

Povolte nově objevený modul/widget

Modul je k dispozici v nabídce

Konfigurace modulu
Podle následujících kroků nastavíte AI asistenta pro diagnostiku problémů ve frontendu Zabbix:
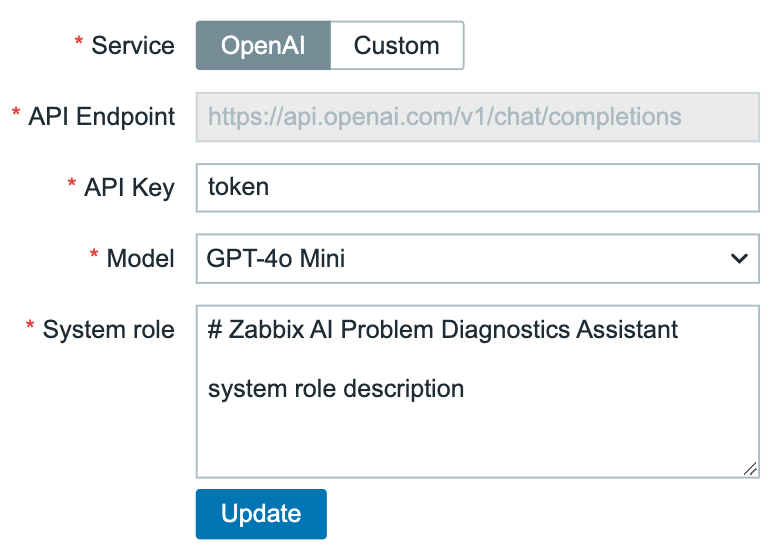
- Přejděte do: Administration → AI general → AI Problem Diagnostic Assistant
- Vyberte si AI službu:
- Možnost A: OpenAI
- Zadejte svůj token API OpenAI
- Vyberte požadovaný model OpenAI (např. GPT-4, GPT-3.5-turbo).
- Možnost B: Custom AI API
- Zadejte vlastní adresu URL koncového bodu API
- Zadejte ověřovací token pro vlastní rozhraní API.
- Možnost A: OpenAI
- Konfigurujte systémové role:
- Vyhledejte soubor ‚PROMPT_SYSTEM_ROLE.md‘ v root adresáři úložiště
- Zkopírujte výchozí System role z tohoto souboru
- Zkopírovaný obsah vložte do pole System role v rozhraní Zabbix.
- Uložte konfiguraci
- Užijte si používání!
Podobné produkty
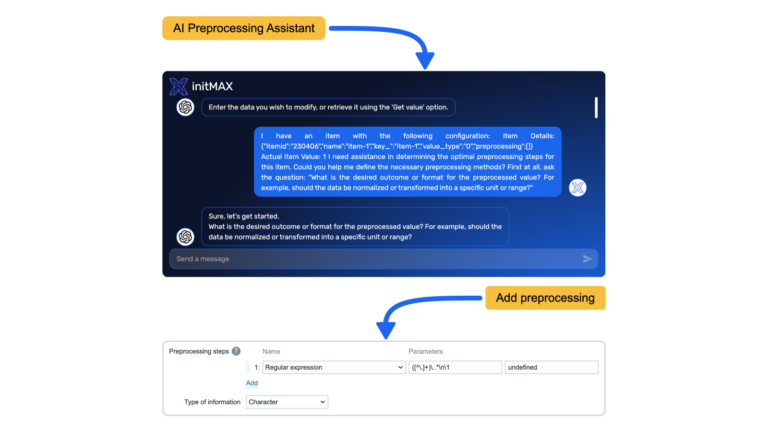
AI Preprocessing Assistant
AI modul pomáhající uživatelům Zabbixu navrhovat kroky předzpracování tím, že na základě požadavků navrhuje sekvence transformace dat.
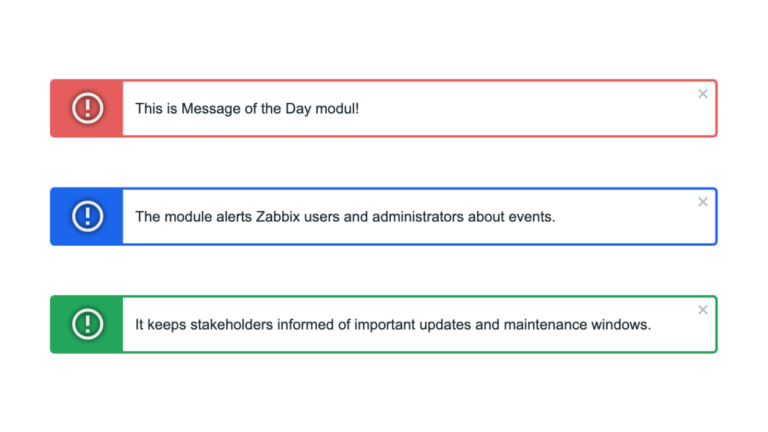
Message of the Day
Informuje uživatele Zabbixu o důležitých událostech, přičemž poskytuje centralizované místo pro sdílení kritických aktualizací, oznámení nebo jiných informací.
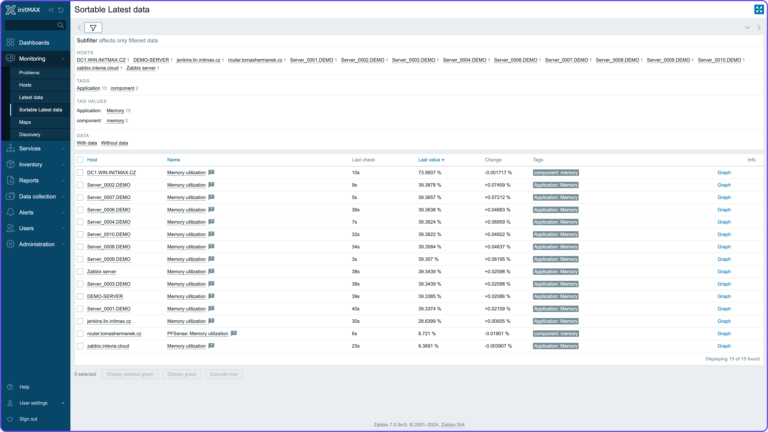
Sortable latest data
Jedná se o rozvětvení tabu „Latest data“ v nabídce monitorování. Tento modul umožňuje seřadit Latest data podle hodnoty vzestupně nebo sestupně.
FAQ
Vyberte požadovaný widget na stránce produktu, který má také placenou verzi. U každého placeného produktu si můžete vyzkoušet FREE verzi a poté si zakoupit verzi PRO, která widgetu přidá další funkce. Kliknete na tlačítko Získat widget a Získat PRO, projdete pokladnou, kde musíte odsouhlasit podmínky nákupu a další náležitosti. Pokračujete do košíku, kde za produkt zaplatíte. Můžete platit kartou, Google Pay nebo Apple Pay, pokud máte zařízení Apple. Platbu zprostředkovává společnost FastSpring. Po zaplacení obdržíte potvrzovací e-mail s potřebnými údaji pro přihlášení do služby Gitlab, odkud si můžete zakoupený produkt stáhnout. Obdržíte také fakturu za objednávku a přístup ke svému účtu, kde si můžete prohlédnout všechny své objednávky a zrušit automatické obnovování předplatného. Produkty se prodávají formou předplatného na 1 rok. Jedná se o 1 licenci pro 1 uživatele, která je vázána na konkrétní e-mail.
Pokud ztratíte přístupové údaje k zakoupenému produktu, klikněte na odkaz „Forgot your password?“ na přihlašovací stránce na adrese https://git.initmax.com/users/sign_in. Zadejte e-mailovou adresu, kterou jste použili při nákupu produktu, a obdržíte pokyny k obnovení hesla. Pokud se při procesu obnovení hesla vyskytnou jakékoli problémy, obraťte se na náš tým podpory na adrese [email protected] a požádejte o asistenci.
Musíte mít nainstalovaný a spuštěný Zabbix 7.0 a PHP verze 8.0. Co se týče hardwaru, potřebujete jakékoli zařízení, na kterém bude Zabbix správně fungovat.
Obdržíte e-mailové potvrzení o úspěšně zaplacené objednávce a fakturu za zakoupený produkt. Najdete zde také odkaz pro přístup k předplatnému a jeho správu. Obdržíte také e-mail s odkazem na initMAX GitLab, kde naleznete zakoupený produkt. Pokud je to váš první produkt zakoupený od společnosti initMAX, budete muset nejprve nastavit nové heslo. Bez ohledu na to, zda již máte účet GitLab pro jiné účely. Za tímto účelem přejděte na odkaz: https://git.initmax.com/users/sign_in a stiskněte tlačítko Forgot your password? (Zapomněli jste heslo?), zadejte e-mail, který jste zadali při objednávce, a stiskněte tlačítko Reset password (Obnovit heslo). Obdržíte e-mail s odkazem pro nastavení nového hesla. Poté se přihlaste prostřednictvím stránky https://git.initmax.com/users/sign_in s novým heslem a e-mailem, který jste zadali při zadávání objednávky. Můžete také kliknout přímo na odkaz zakoupeného produktu, který vám bude zaslán v e-mailu s potvrzením objednávky, a přihlásit se tam. Nyní můžete získat přístup k zakoupenému produktu a stáhnout si jej.

